3 Scenic Drive Routes in Kyushu, Japan: Aso, Nichinan Coast & Takachiho Gorge
3 Scenic Drive Routes in Kyushu, Japan: Aso, Nichinan Coast & Takachiho Gorge
Planning a scenic drive in Kyushu? Instead of piling on destinations, pick one of three themes — volcano, coastline, or gorge — and your trip practically plans itself. The volcanic drama of Aso, the easygoing seaside run along the Nichinan Coast, and the walking-focused route through Takachiho Gorge work for anyone from first-time renters to seasoned road-trippers.
Planning a scenic drive through Kyushu, Japan? Rather than cramming in as many stops as possible, choosing from three distinct themes — volcano, coastline, or gorge — will give you a far more satisfying trip. Aso delivers raw volcanic drama from behind the wheel, the Nichinan Coast unfolds as an easy seaside cruise punctuated by ocean viewpoints, and Takachiho Gorge rewards those who park the car and explore on foot. These three routes cover the sweet spot for rental-car travelers, whether you are new to driving in Japan or already comfortable with its roads.
This article breaks each route down into practical pieces: model timelines for day trips through two-night stays, realistic driving distances, time requirements, peak seasons, and the risks around closures and congestion. Conditions around Aso's crater and road access shift day to day, so the plans here assume you will check the latest updates from the Japan Meteorological Agency, road authorities, and venue websites before heading out.
Choosing Your Kyushu Scenic Drive by Type
Comparing the Three Routes
Kyushu's scenic drives sort neatly into three types: Aso, where the road itself is the attraction; the Nichinan Coast, where you hop between ocean viewpoints; and Takachiho Gorge, where the real experience begins after you leave the car. Framing your trip around one of these makes itinerary building far simpler than mixing everything together. The character of each landscape is so different that deciding what kind of experience you want matters more than adding destinations.
Aso's signature route threads together Kusasenri-ga-Hama, Mt. Nakadake crater, Komezuka, and the outer caldera rim — the drive itself doubles as a sightseeing highlight. The Nichinan Coast strings together Aoshima, Horikiri Pass, Udo Jingu shrine, and Cape Toi along a south-running shoreline. Takachiho Gorge puts the gorge scenery front and center, with walking trails and rental boats that draw you physically into the landscape.
These three share the label "scenic drive," yet each delivers a different kind of satisfaction. If the thrill of the drive itself is what you are after, Aso is the clear choice. If you prefer a rhythm of pulling over to absorb ocean views and then rolling on, the Nichinan Coast fits. And if you want dedicated time walking through scenery rather than watching it pass, Takachiho Gorge is the one. The gorge features cliffs rising 80 to 100 meters and stretches roughly 7 km, so on-site immersion far outweighs anything you could catch from the car window. Aso, on the other hand — as featured in the Aso Panorama Line guide on JAF Mate Online — packs shifting volcanic terrain across a roughly 37 km route where the act of driving is the experience.
Stringing all three themes into a single trip is not something this article recommends. The reason is straightforward: Kyushu is big, and its terrain transitions add real driving time. Forcing volcano, coast, and gorge into one itinerary pushes car time above sightseeing time and makes it harder to reach each area at the best hour. Takachiho Gorge especially does not work as a drive-through — you need walking time after arrival, which clashes with the flow of Aso or the Nichinan Coast.
Here is how the three types compare side by side:
| Type | Main Scenery | Time Needed | Key Risks | Best Season | Driving Difficulty |
|---|---|---|---|---|---|
| Aso Volcano Route | Active volcano, grasslands, caldera | Day trip to 1 night | Crater restrictions, traffic, sudden weather changes | Mornings with clear visibility; crisp-air seasons | Medium |
| Nichinan Coast Route | Coastline, capes, subtropical plants | Day trip to 1 night | Typhoon/storm impact, choosing old road vs. bypass | Times when morning and evening sea light is strongest | Low–Medium |
| Takachiho Gorge Route | Columnar basalt, waterfalls, gorge | Half day to full day | Boat congestion, walking time on trails | Mornings when you can beat the crowds | Low |
To decide, weigh three factors: your starting point, the season, and your priority experience. Coming in from the Kumamoto (Kumamoto Prefecture, Japan) side? Aso is the natural fit. From the Miyazaki (Miyazaki Prefecture, Japan) side? The Nichinan Coast or Takachiho Gorge will be easier to build around. Seasonally, typhoon-prone months lower the appeal of coastal routes, and deep cold makes Aso's highland stops more punishing — Daikanbo observation point sits at about 936 m elevation, so expect temperatures roughly 6 degrees Celsius lower than the plains, with wind chill making short stops feel colder still. By experience type: driving thrills point to Aso, ocean views to the Nichinan Coast, and on-foot exploration to Takachiho Gorge.
Matching by traveler style: couples tend to enjoy the Nichinan Coast with its many pull-over spots or Takachiho Gorge where sharing the boat and trail experience works well together. Solo travelers often click with Aso for unbroken focus on road and scenery, or Takachiho Gorge for self-paced walking. Families will find the Nichinan Coast the most adjustable, with frequent stop options and built-in rest breaks that help manage car sickness.
阿蘇パノラマライン(熊本県)。世界最大級の火山を望む、九州随一の絶景ドライブウェイ|日本の絶景ドライブルート|JAF Mate Online
世界最大級の火山を望む、九州随一の絶景ドライブウェイ、阿蘇パノラマラインをドライブします。四季折々で輝く絶景に出会えるドライブコースを、日本の隅々まで走り尽くした写真家の須藤英一さんが紹介。
jafmate.jpRealistic Itineraries by Number of Days
Working backward from your available days, the fit for each route becomes clear. A day trip works best with a single theme. Aso means a loop centered on Kusasenri-ga-Hama and the volcanic scenery; the Nichinan Coast means heading south from Aoshima along the shoreline; Takachiho Gorge means carving out time for the gorge walk. Narrowing to one theme keeps the balance between driving and sightseeing healthy.
With one overnight, two themes at most become realistic. From Kumamoto, anchor on Aso and add surrounding viewpoints. From Miyazaki, start with either the Nichinan Coast or Takachiho Gorge and layer in a second. Even with two themes, mixing a "driving" landscape with a "walking" landscape tends to lift satisfaction — pairing Aso with Takachiho Gorge, or the Nichinan Coast with Takachiho Gorge, keeps the photo variety high and the itinerary from going flat.
Two nights let you go deep on two themes while keeping transit comfortable. Resist the urge to squeeze in a third. A better play: spend a morning capturing Aso's early-light scenery, use a travel day in between, then give Takachiho Gorge the walking time it deserves. The Nichinan Phoenix Road runs roughly 80 km, and treating it as a pure drive-through misses the point — Horikiri Pass and Udo Jingu shrine both reward proper stops, so budget a full day. At Takachiho Gorge, the trail alone takes about 30 minutes one way, and if you add a boat ride, on-site time adds up faster than expected.
From personal experience, Kyushu road trips leave a stronger impression based on whether you arrived during the right light rather than how many places you ticked off. Aso's grasslands open up best in morning light. The Nichinan Coast shines when the sun hits the water in early morning or late afternoon. Takachiho Gorge feels most atmospheric when foot traffic is light. That is exactly why adding more stops as your trip gets longer tends to backfire.
Why a Rental Car and Where Public Transport Falls Short
Across all three route types, a rental car is the most practical choice. You can technically reach these areas by public transport, but the scenic-drive experience takes a hit (for tips on traveling Kyushu without a car, see our rail-only itinerary guide). Limited bus frequency, connection hassles, and long gaps between stops all work against you. Aso is a prime example: a bus runs from Aso Station to the Kusasenri Aso Volcano Museum stop in about 25 minutes for 570 yen (~$4 USD), but this single link makes it hard to chain together Kusasenri, the Nakadake crater, Komezuka, and the viewpoints along the outer rim.
The advantage of a rental car is not raw speed. It is the ability to adjust on the fly — heading to the coast first because the sky cleared that direction, skipping a crowded spot in favor of a quieter trail, pulling over for five minutes at a viewpoint that caught your eye. Kyushu's best scenery tends to sit along roads rather than at terminal-type destinations. In Aso, the caldera depth you see while driving is part of the payoff. On the Nichinan Coast, the continuous interplay of ocean and capes builds the atmosphere. Around Takachiho, the mountain-valley mood before and after the gorge is as much a part of the trip as the gorge itself.
💡 Tip
Starting from Kumamoto? Head to Aso first. Starting from Miyazaki? The Nichinan Coast or Takachiho Gorge will plug in more smoothly. Getting the starting point and the first theme aligned frees up a surprising amount of slack in your day.
Public transport is not off the table entirely, but the three routes here are all "area" experiences rather than "point-to-point" trips. That is why a rental car holds the clear edge for covering scenic ground without leaving gaps.
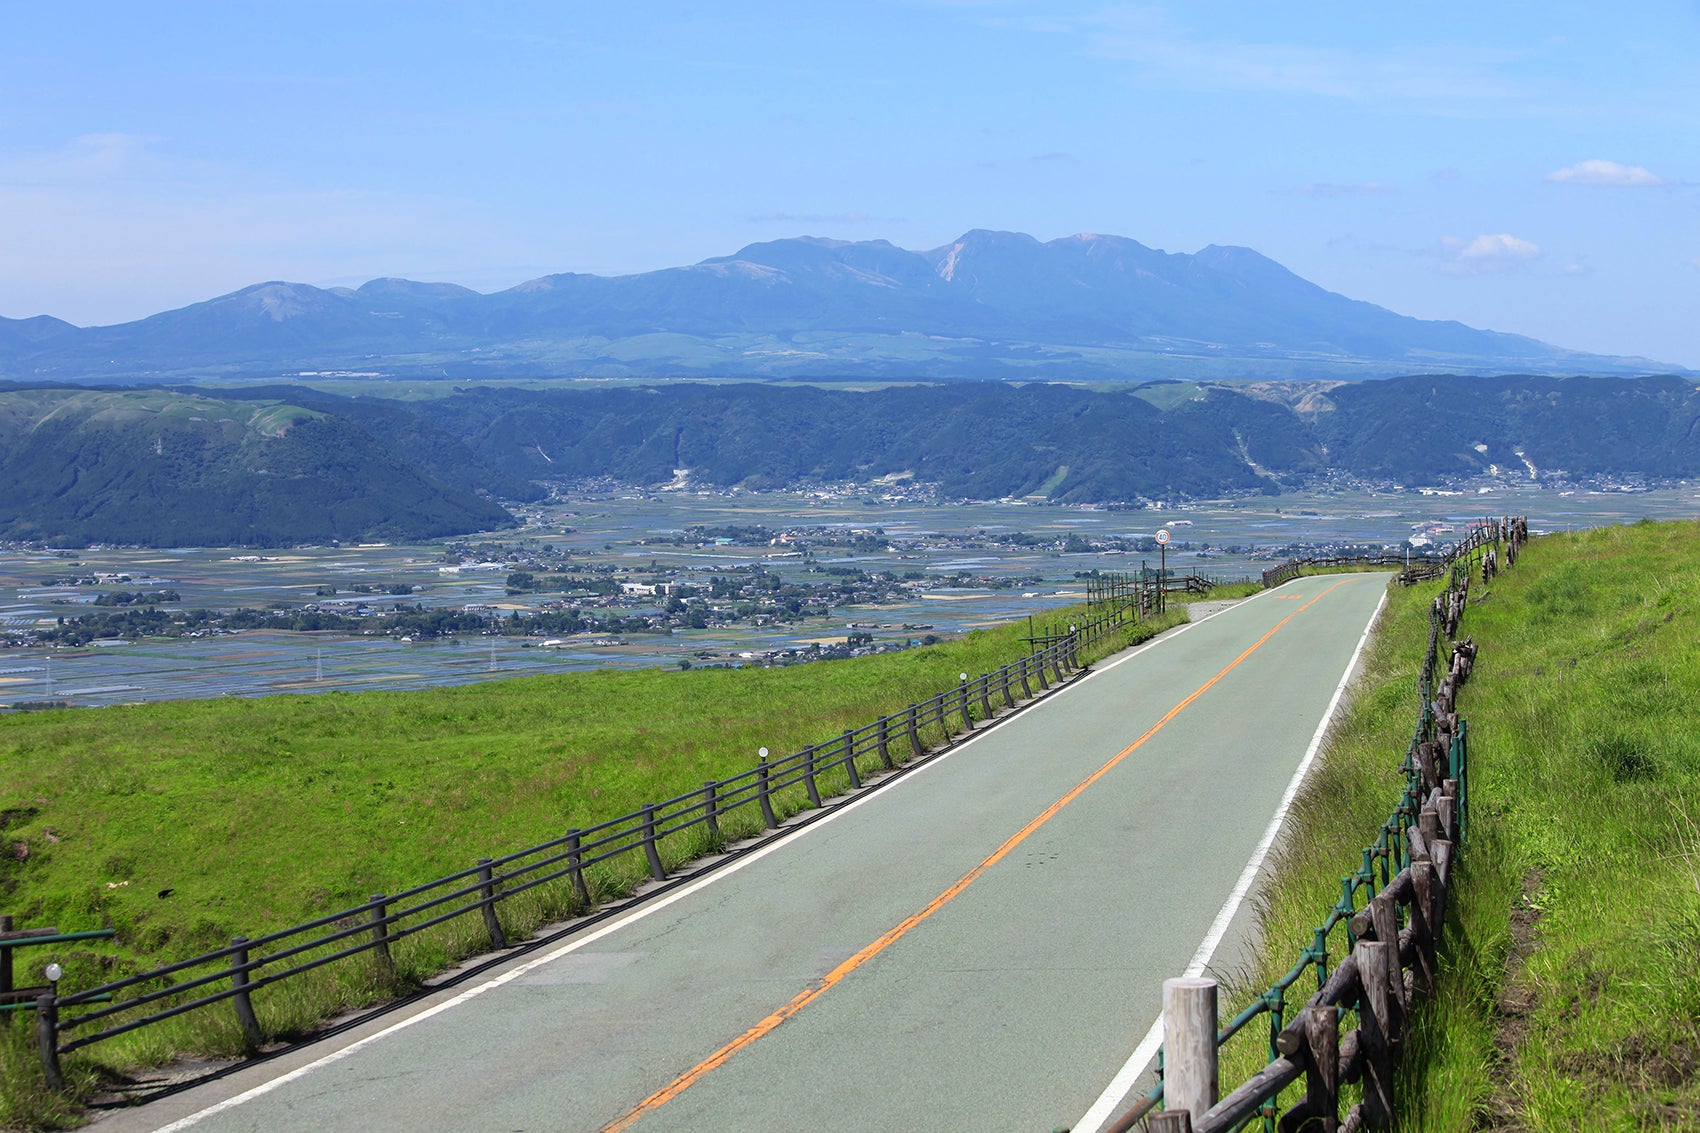
Driving Through Volcanic Scenery: The Aso Panorama Line Loop
Route Overview and Distances
The most accessible way to experience Aso's "driving as scenery" character is the roughly 37 km loop featured on JAF Mate Online's Aso Panorama Line page. The distance is manageable, but what makes this route special is how the lead role keeps changing as you drive. Rolling grasslands, steaming volcanic terrain, the perfectly conical Komezuka hill, and the outer caldera rim all come and go within a single area. For packing Kyushu's volcanic landscape into one efficient route, this is the logical starting point.
The centerpiece is Kusasenri-ga-Hama — a grassland plateau at roughly 1,140 m elevation with a diameter of about 1 km, cradled against the base of the Aso Five Peaks. As your car approaches, the view suddenly opens wide, flat green stretching out toward volcanic ridgelines that rise sharply behind it. This is often the first spot where Aso's scale hits you viscerally. I would describe Aso's scenery not as "big" but as terrain contours pressing right up against you — and Kusasenri is where that sensation clicks into place.
Adding the Nakadake crater to the route shifts the landscape's personality again. If Kusasenri shows off the scale of grassland and caldera, Nakadake brings you close to volcanic activity that is still very much happening. The Aso Mountain Park Road costs 1,000 yen (~$7 USD) per standard vehicle, and the drive toward the crater side serves as a memorable accent within the loop. That said, crater access gets shut down on some days due to volcanic activity, so treating the crater as a bonus rather than a must keeps the overall plan resilient.
Komezuka does not demand long stops, but it rounds out the route's overall impression. After sweeping grasslands and raw volcanic ground, this neatly symmetrical cone adds a different texture that underscores how varied Aso's terrain really is. Shifting your gaze higher to the outer caldera rim reveals the larger picture — Aso is not a standalone mountain but a landscape nested inside a massive geological structure. Daikanbo viewpoint ties this understanding together, offering a vantage where the outer rim and the Aso Five Peaks compose into a single panorama.
Model Timeline (Approximate)
The timeline below reflects on-the-ground experience and should be treated as a rough guide. Weather, congestion, and road conditions can shift things significantly, so build in buffer time before you leave.
For a day trip from Kumamoto Airport, budgeting 6 to 7 hours for driving and stops combined tends to keep the pace comfortable. Aso has plenty of detour candidates, so rather than packing the schedule tight, prioritizing the higher-elevation viewpoints during the morning hours generally produces a better result. Route 57 toward Aso tends to slow down around late morning on weekends, so departing the airport around 9:00 and heading for Kusasenri first is a practical starting frame.
Running the loop in reverse also works well. On days when you want to dodge midday Route 57 traffic or want the outer-rim views first, starting at Daikanbo in the morning and descending toward Kusasenri tends to smooth out the flow. Aso often works better when you sequence stops by avoiding peak congestion times rather than ordering them by personal preference — paradoxically, that tends to give you more time at each spot.
Stops and Suggested Time at Each
Kusasenri-ga-Hama is the stop most worth investing time in on this route. Plan for 30 to 60 minutes. Snapping a few photos and moving on is possible, but walking a short way into the grassland changes your perspective noticeably. The plateau stretches about 1 km across, and even from the parking area it feels vast — but a few minutes on foot shifts the way the Aso Five Peaks loom, making the same place look different.
If Nakadake crater is accessible that day, it jumps to high priority. Keep the visit focused rather than lingering too long, and fit it into the flow between other stops so the schedule stays intact. Whether or not you can get close to the crater changes the density of the day, so think of this less as a fixed destination and more as a bonus that the day's volcanic conditions may unlock. On days when the crater is closed, pivoting to the Aso Volcano Museum fills the gap and adds context beyond pure scenery.
Daikanbo works well as a 20- to 40-minute stop. The observation area itself is free to enter, and travel guides commonly note free parking, though official sources do not always specify capacity or fees clearly — confirm the current parking arrangement with local municipal information before you go. The walk from the lot to the viewing side is short but involves a slope and wind exposure, so sturdy shoes rather than sandals will let you focus on the view.
ℹ️ Note
For a strong photo sequence, frame it as: Kusasenri for the wide grassland, Nakadake crater for intensity, Komezuka for its sculpted form, and Daikanbo for the full geological context. This progression keeps every shot distinct despite staying in the same area.
Crater Restrictions, Traffic, and Weather Risks
The three factors most likely to disrupt an Aso itinerary are crater access restrictions, Route 57 congestion, and highland weather shifts. The Nakadake crater stands out because whether you can visit completely changes the route's feel. The Japan Meteorological Agency publishes eruption alert levels, while actual entry restrictions and road closures involve separate decisions by local authorities and road managers — so building a plan that does not depend on crater access is the more stable approach.
Traffic on Route 57 makes a meaningful difference. Aso-bound flow tends to thicken around midday on weekends and holidays, and a late airport departure pushes your Kusasenri arrival further back. Aiming to reach the outer rim or Kusasenri early in the morning and then keeping afternoon movement within Aso itself reduces the odds of a traffic-related setback. On days when congestion is predictable, the reverse loop — Daikanbo first, then down toward the crater area — is a solid alternative.
Weather-wise, altitude-driven temperature swings and strong winds hit your comfort directly. At Kusasenri and Daikanbo, even a mild day in the plains can feel noticeably cool, and wind amplifies the effect. Daikanbo at roughly 936 m elevation runs about 6 degrees Celsius cooler than lowland areas — a useful mental benchmark. On days when mist rolls in, only the near scenery is visible and the caldera's depth and outer-rim profile disappear, so morning hours generally offer better odds for clear long-range views.
Road conditions deserve attention as well. Route 57 has improved significantly, but the possibility of closures from natural events or preemptive restrictions has not gone to zero. The Ministry of Land, Infrastructure, Transport and Tourism's road information system tracks broader access status. Aso is simultaneously a tourism corridor and a mountain road — keeping both labels in mind is the realistic way to plan.
道路情報提供システム
www.road-info-prvs.mlit.go.jpBackup Plans for Rain or Restrictions
On days when the crater is off-limits or strong winds and mist kill the long views, recentering on the Aso Volcano Museum and outer-rim viewpoints tends to keep satisfaction intact. Kusasenri holds up reasonably well even in less-than-perfect weather — rain deepens the grassland's color and gives it a character that clear skies do not. Pairing Kusasenri with the museum covers the gap left by a closed crater effectively.
If you pivot toward viewpoints, Daikanbo remains a strong option. Even when crater-side access is restricted, the composition of the Aso Five Peaks seen from the outer rim still works, and the geological overview it provides holds its own. Low clouds may cap the distant views, but gaps in the cloud cover can reveal patches of mountain flank in a way that the crater approach never offers — it is a different kind of waiting, and sometimes a rewarding one.
For a longer detour that shifts the scenery's character, Oshitoishi no Oka — also listed in the Aso Best Spots 17 guide — can be worth folding in. At over 800 m elevation it carries a highland openness distinct from Aso's core, and the quiet feel separates it from the busier areas. The Mazeno Mystery Road area has undulating terrain and surface conditions that require attentive driving, so this works more as a supplement on days when you want extra elevation and openness rather than a full crater replacement.
In rain, scaling back the number of stops and spending more time in the Kusasenri area tends to produce a trip that feels coherent rather than scattered. Aso's fame rests on its clear-day scale, but even when restrictions or weather swap out the lead attraction, the three layers — grassland, volcanic terrain, outer rim — remain. The fact that backup options exist within a single route is one more reason the Aso Panorama Line works so well for day trips.

九州旅ネット
九州の観光地・グルメ・イベントなど、さまざまなテーマの観光情報の特集記事を掲載しています。九州の旅の計画に役立つ情報をご覧いただけます。
www.welcomekyushu.jpDriving the Coastal Scenery: Nichinan Phoenix Road Southbound
Route Overview and Why the Old Road Wins
The Nichinan Phoenix Road's appeal comes from turning a roughly 80 km coastline between southern Miyazaki City and Cape Toi into something you savor through repeated stops rather than a simple point-to-point drive. As the Nichinan Phoenix Road guide describes it, this stretch of seaside driving constantly shifts between coastline, subtropical plants, and cape contours. Unlike Aso's rush of continuous road scenery, this route is best understood as a string of viewpoints connected by ocean-facing driving — plan that way and the day comes together.
The core stops are Aoshima, Horikiri Pass, Michi-no-Eki Phoenix, Sun Messe Nichinan, and Udo Jingu shrine. With extra time, extending south to Cape Toi wraps the coastal drive into a satisfying "journey toward the cape" arc. On days when pushing further feels like too much, turning around at Udo Jingu still delivers a full experience — the essential coastal DNA is already in place by that point.
One thing worth flagging on this route: choosing the old road pays off. The newer bypass sections flow faster, but the old road opens up more consistent ocean views, keeps the sea visible at better angles, and makes it easier to pull into viewpoints and rest areas. I always want "unbroken scenery" over "faster arrival" on this road. Between Horikiri Pass and Michi-no-Eki Phoenix in particular, the old road lets you repeatedly catch the ocean and the washboard rock formations (known as "Devil's Washboard") in a way the bypass simply does not.
Aoshima works perfectly as a warm-up. Walking across to the island and through to Aoshima Shrine is a natural first move, and it blends coastal scenery with a short exploration in a compact package. From there, Horikiri Pass and Michi-no-Eki Phoenix offer elevated views down the coastline, Sun Messe Nichinan spreads out a sweeping hillside-and-ocean composition, and Udo Jingu introduces cliff faces and a shrine atmosphere that feels nothing like the rest of the coast. The trick with this lineup is that despite being on the same stretch of shore, no two stops repeat the same mood.

日南フェニックスロード
南国情緒たっぷりの絶景オーシャンビューロード
www.driveconsultant.jpModel Timeline (Approximate)
The schedule below draws from personal experience. Congestion, parking waits, and venue hours can all shift things, so treat the time allocations as flexible.
For a day trip starting from central Miyazaki City, heading south in the morning and making your call by late afternoon is the most manageable structure. With proper stops factored in, 6 to 7 hours keeps the day from feeling overstuffed. During peak periods, parking lot entry and exit at each stop can stall the flow, so mentally adding 30 to 60 minutes of buffer tends to be realistic.
From there, two paths open depending on energy and sunset timing. If the day still has room, continuing toward Cape Toi and placing the 16:30-onward hours on the cape side gives the coastal drive a more complete finish. On days when time is tight or you spent longer at Aoshima or Udo Jingu, treating Udo Jingu as the effective turnaround point and heading back avoids an uncomfortable crunch. The Nichinan Coast rewards leisurely absorption at its best spots over trying to check everything off.
Navigating the Stops and Time at Each
The key rhythm is alternating between places you walk and places you enjoy from the car. Walking at every stop drains energy for the second half, while never getting out turns the Nichinan Coast into a forgettable blur. Designate Aoshima, Sun Messe Nichinan, and Udo Jingu as the main "get out and walk" destinations, then slot Horikiri Pass and Michi-no-Eki Phoenix in between as short viewpoint breaks. That alternation creates a comfortable tempo.
Aoshima is a strong opener for the route. The sense of crossing out to an island lifts your mood right away, and the flow toward Aoshima Shrine feels organic. Budget 60 to 90 minutes, and arriving in the morning sets a good pace for the rest of the day. On bright days, reflected light off the water makes even the morning feel intensely tropical.
Horikiri Pass serves more as a viewpoint to frame the coastline than a place to spend significant time. After getting close to sea level around Aoshima, you gain some height here and look down along the full coastal contour. Michi-no-Eki Phoenix plays a similar role but doubles as a rest stop — useful as a natural driving break. Taking the old road makes both of these easy to access without the "saw it but drove past" regret.
Sun Messe Nichinan puts you on a slope that looks out over the ocean with a wide field of view. Allow roughly 60 minutes to avoid feeling rushed. Visitors who prioritize photos tend to linger longer here, and among all the Nichinan Coast stops, this is where a single shot can capture the most expansive "sky meets sea" feeling. After sitting in the car, walking across the open hillside resets your perspective.
Udo Jingu shifts the atmosphere in a way no other stop on this route does. The cliff setting and the shrine's approach paths create a mood that runs far deeper than "another ocean view." The round trip takes roughly 30 to 45 minutes, with stone steps adding both time and physical effort. Like Aoshima, this is a place that sticks in memory specifically because you walked it — rushing through here lowers the quality of the entire route.
💡 Tip
For a photo progression that tells a story: Aoshima for close-up coastal detail, Horikiri Pass and Michi-no-Eki Phoenix for elevated coastline panoramas, Sun Messe Nichinan for open-air grandeur, and Udo Jingu for the dramatic cliff-and-shrine pairing.
Typhoons, Storms, and Driving Tips
The Nichinan Coast is the route in this guide most exposed to typhoons, high waves, and strong winds. On clear days the ocean blue and subtropical feel come through powerfully, but rough weather flips the coastal advantage into a vulnerability. During typhoon season especially, the issue is less about road closure and more about stops becoming unusable — viewpoints and seaside facilities lose their appeal or close when conditions deteriorate.
Even on sunny days, glare off the ocean deserves attention. With few shaded stretches compared to mountain roads, the brightness can be fatiguing, and midday reflection off both pavement and sea surface wears on your eyes. Sunglasses make a tangible difference to driving comfort on the Nichinan Coast. On a drive built around looking at scenery, not having your concentration eaten by glare matters.
The driving itself is not technically difficult, but the scenery being so good tends to pull your eyes off the road. On this route, a stop-and-look approach works better — and is safer — than trying to appreciate the views while driving. Use the old road for leisurely stops at viewpoints, and switch to the newer sections when you want to cover ground. Deciding in advance where you will pull over keeps the driving calm.
On stormy days, cutting the route short at Udo Jingu rather than pushing to Cape Toi keeps the day balanced. The core coastal experience is already baked in by that point, and strong winds make the southern extension more effort than reward — you end up driving longer but spending less time outside the car. The Nichinan Coast is at its best in good conditions, so building in the flexibility to call it a "short day" or a "full run" based on the weather is the practical move.
What to Cut and How to Shortcut When Time Is Tight
The first candidate for trimming is the Cape Toi extension. It adds completion to the coastal arc but functions better as an optional endpoint on day trips. The stretch from Aoshima through Horikiri Pass, Michi-no-Eki Phoenix, Sun Messe Nichinan, and Udo Jingu already delivers the essential Nichinan Phoenix Road experience.
Next, adjust how much time you spend at Horikiri Pass and Michi-no-Eki Phoenix. These two sit close together and complement each other, but giving both extended stops is not necessary. Getting a solid coastline overview at either one lets you keep the other as a quick rest break without losing the flow. Aoshima and Udo Jingu, on the other hand, are walking experiences at their core — cut their time too aggressively and the overall trip suffers.
A useful shortcut philosophy: take the old road southbound for the scenery, then use the newer road northbound to save time on the return. If you secure the key views at Aoshima and the Horikiri Pass area in the morning, several segments become painless to skip on the way back. Whether to include Sun Messe Nichinan is another flexible decision — keep it for a photo-heavy day, drop it when shrine and coastal geology are your priority — and this kind of swapping works without breaking the route's character.
For the most streamlined day trip from central Miyazaki City: walk Aoshima, hit either Horikiri Pass or Michi-no-Eki Phoenix, stop at Sun Messe Nichinan, and finish with Udo Jingu. This holds the essential coastal drive elements while keeping stop-overload from unraveling the schedule. The Nichinan Coast looks more impressive on paper the more stops you add, but in practice, using the old road to keep the ocean in view over and over is the route's true luxury.
Driving Through Gorge Scenery: A Mountain-Valley Route Centered on Takachiho Gorge
How Takachiho Gorge Formed and the Basics of Walking It
Takachiho Gorge (Miyazaki Prefecture, Japan) was shaped when pyroclastic flows from Aso rapidly cooled into rock, which the Gokase River then carved over millennia. The defining feature is columnar basalt — tall, straight fractures lining the cliff walls — with drops of 80 to 100 meters and the gorge stretching roughly 7 km. Driving in, it reads as a quiet mountain-area attraction. Standing at the edge, the vertical rock faces plunging down to the water create a three-dimensional impact that photographs consistently understate.
This is why the route qualifies as a "scenic drive" yet belongs in the walking category. Takachiho Gorge is not a drive-through view. Satisfaction scales with how much you explore on foot. The main trail runs roughly 1 km from the third bridge parking area to the boat dock, about 30 minutes one way. That sounds short on paper, but overlooks along the gorge, spots where the trail dips toward the water, and the inevitable pause at Manai Falls mean your actual time is dominated by stopping rather than moving.
Manai Falls is the gorge's signature and an essential photo stop. Walking there and back takes 30 to 60 minutes; covering the broader trail with surrounding views pushes it to 60 to 90 minutes. My approach to Takachiho is simple: the car is transport to the trailhead, and the real trip starts on foot. The mountain-valley quietness and the atmosphere of this place — deeply tied to Japanese mythology — only emerge when you slow to walking speed.
Model Timeline (Approximate)
The timeline below draws from personal experience. Trail congestion, boat wait times, and seasonal daylight differences can shift your schedule, so stay flexible.
- 9:00 — Arrival
Park and switch your mindset to walking. The morning calm in the gorge is tangible, and fewer visitors at this hour mean cleaner photos.
- 9:15 — Trail walk to Manai Falls
Allow 60 to 90 minutes for the round trip. Walk the gorge taking in the rock formations, then spend a bit longer around the falls themselves.
- 11:00 — Rental boats
Doing the boat ride after the trail walk deepens your understanding of the scenery — you already know the cliff layout from above.
- 12:30 — Takachiho Shrine
Shrine visit and grounds exploration, roughly 20 to 30 minutes.
- 14:30 — Amano Iwato Shrine and Amano Yasukawara
Budget 60 to 90 minutes for the round trip.
- 16:00 — Wrap up
For a day trip, closing around this time leaves comfortable margin.
ℹ️ Note
A day at Takachiho flows naturally when layered as gorge, then shrine, then mythology site. Going beyond "just the scenery" to pick up the cultural context keeps first-time visitors from feeling like they saw a collection of disconnected spots.
Boat Rental: Prices, Crowds, and Safety
The rental boats at Takachiho Gorge rank among its most popular draws. Looking up at Manai Falls from the water gives you a composition available nowhere else, and it is a genuinely different experience from the trail. Pricing is 4,100 yen (~$27 USD) per boat on weekdays and 5,100 yen (~$34 USD) per boat on weekends, holidays, and designated peak periods — consistent with the Takachiho Gorge sightseeing guide's breakdown.
Boats are also the single biggest congestion factor at the gorge. On busy days wait times stretch considerably, and a numbered-ticket system may be in effect. Takachiho looks like a place where you can decide what to do after arriving, but if the boat ride is your priority, plan walking time and waiting time as a single block.
On the water, the gorge scenery pulls your attention upward — which is the whole point — but keeping your movements steady makes both the ride and the views more enjoyable. When you drift close to the banks or other boats, settling the boat's position before looking up tends to produce better results than reaching for a camera first. I prefer doing the trail before the boat, and the reason is practical: having the cliff layout already mapped in your head from above means less disorientation and more appreciation from water level.

【宮崎】高千穂峡観光の楽しみ方!遊歩道やボートから見る絶景の回り方や所要時間も紹介 |じゃらんニュース
高い断崖と深い峡谷が美しい景観を作り出す、宮崎県・高千穂峡は、『古事記』や『日本書紀』に記された神話が伝わる場所であり、日本を代表する景勝地のひとつ。おすすめの撮影スポットやボートの乗り方など、高千穂峡の楽しみ方を紹介。首都圏からのアクセス
www.jalan.netAccess, Parking, and Beating the Crowds
Takachiho takes longer to reach than the map suggests. Whether you are coming from Miyazaki City or the Nobeoka direction, the mountain-valley sections slow your pace below what flatland driving would predict. On this route, "what time do I arrive" matters more than "what time do I leave," and early morning arrival pays off across the board — easier parking, quieter trails, and shorter boat waits.
Practically, placing the gorge walk in the first half of the morning is the most straightforward approach. Because walking time is guaranteed once you leave the car, arriving around midday tends to create a bottleneck at some stage — parking, trail access, or boat queue. Early arrivals get quiet gorge air, the sound of rock and water without competing noise, and the atmospheric quality that earns Takachiho its reputation as a land of mythology. That atmosphere is strongest when the crowd density is lowest.
Planning your movement from the parking area in advance also eliminates wasted time. Decide whether it is a gorge-only day or one that extends to Takachiho Shrine and Amano Iwato Shrine — the weighting of on-site time shifts accordingly. Days that lean heavily into the gorge call for lighter shrine visits, while days that prioritize the mythology sites work better with the trail as the focus and the boat ride dropped.
Backup Plans for Rain or Limited Time
Rainy days at Takachiho Gorge intensify the water and rock textures, but the trail surface gets slippery and high water can trigger access restrictions. The result is a day with a different character than the usual clear-weather walking tour — better framed as "exploring the Takachiho area" than "walking the gorge trail."
When time is short, the boat ride is the first thing to cut. The gorge itself is the core, and the trail alone delivers plenty of scenic density. A focused walk around the Manai Falls area followed by a stop at Takachiho Shrine still covers both the natural and spiritual sides of the area. For a stronger mythology emphasis, shifting time toward Amano Iwato Shrine and Amano Yasukawara also works well.
On rainy days or half-day visits, a distribution of a shortened gorge walk, 20 to 30 minutes at Takachiho Shrine, and 60 to 90 minutes at Amano Iwato Shrine and Amano Yasukawara keeps walking effort manageable while maintaining a clear thematic thread. Takachiho Gorge holds up as a standalone destination, but adding the shrines means the trip is remembered as something beyond "I saw a scenic spot" — it becomes a memory rooted in the place itself. When the mountain-valley driving and the quiet on-foot exploration click together, this route becomes one of the most resonant scenic drives in all of Kyushu.
Seasonal Recommendations, Weather, and Restriction Risks
Which Season Suits Which Route
In Kyushu, the season you choose shapes satisfaction more than the destination itself. The most consistently rewarding window is the fresh green period from April through June. Aso's grasslands hit their most vivid color, Takachiho's gorge vegetation thickens to add depth in both photos and in person, and the heat has not yet arrived to cut into walking stamina. Aso's highlands are not uncomfortably cold, and the overall conditions across all three routes favor movement.
Summer (July through September) is when the coastal route comes alive. The Nichinan Phoenix Road's 80 km of coastline under blue sky and summer light delivers exactly the subtropical mood this route was made for. Aoshima and the Horikiri Pass area look their most vivid in summer sun. The trade-off is that the coast's appeal and typhoon risk run in parallel — clear days are outstanding, but wind and rain push coastal driving from strength to weakness.
Autumn (October through November) pairs well with Aso and Takachiho. The gorge's rock, water, and tree color overlap to produce deeper shadows and richer contrast, while Aso's grasslands take on a golden tone and the ridgelines show subtler but striking shifts. Clear autumn air extends the visible range for distant views, and the volcanic terrain's outlines sharpen. For travelers who want dedicated walking time in the scenery, Takachiho in autumn is an excellent match.
Winter (December through February) swings between days that work and days that do not. Aso's highlands bring road icing and strong winds, and some viewpoints are too cold for extended stays. Yet on dry, clear winter days, visibility can stretch further than in any other season, and the caldera's scale and Aso's ridgeline come through with unusual clarity. Winter is less "reliably enjoyable" and more "deeply rewarding when conditions align." Takachiho does not hit as hard with altitude-based cold as Aso, but mornings and evenings chill quickly, so budgeting for heat loss during gorge walks is practical.
Restriction and Storm Checklist
What tends to break plans in this area is misreading restrictions rather than encountering traffic. Aso is the primary example: day-to-day operational changes around the Nakadake crater area are the baseline to plan around. The Japan Meteorological Agency manages eruption alert levels, and actual entry restrictions and road closures are layered on by local authorities and road managers. The question is not "can I go to Aso" but "how far into the crater zone can I get today." Beyond the crater, road closures, parking restrictions, and Aso Mountain Park Road operations (1,000 yen / ~$7 USD per standard vehicle) also shift on short notice — which is why not treating crater access as a plan requirement makes the whole itinerary more robust.
On the coastal side, typhoon season from summer into early autumn is the variable to watch. The Nichinan Coast on a calm day supports a comfortable rhythm of stops and restarts, but wind and waves turn the shoreline advantage into a liability. Even when viewpoints are physically accessible, disruptions to road conditions and facility operations along the way break the stop-by-stop flow that makes this route work. Seaside facilities like Sun Messe Nichinan and viewpoint-adjacent shops can shift to shortened hours or temporary closure in rough weather. The coastal route takes a hit from weather not just in visibility but in the density of available stops.
The four items worth tracking boil down to:
- Aso crater restrictions: Eruption alert levels plus the access scope around crater-area roads
- Road closures: Ministry of Land, Infrastructure, Transport and Tourism road information system for blockages and disaster-related restrictions
- Coastal facility operations: Sun Messe Nichinan, viewpoint shops, and similar venues for closures or reduced hours
- Backup alternatives identified: Kusasenri and outer-rim views for Aso; gorge-walk-focused itinerary for Takachiho
💡 Tip
On rough-weather days, deciding "what can I drop and still have a good trip" before you leave works better than trying to force the full plan. Treat Aso's crater, Takachiho's boats, and Nichinan's seaside facilities as the flexible slots — everything else tends to hold up.
Timing Strategies to Avoid Crowds
The same route can feel completely different depending on the hour — time of day matters more than the specific location for crowd management. Aso gets heavy from late morning through midday on holidays, Takachiho Gorge's busiest window is 10:00 to 14:00 on weekends, and the Nichinan Coast thickens after midday on long weekends. The congestion type is less about highway gridlock and more about parking queues and foot traffic stalling your rhythm, so the solution is not avoiding popular places — it is getting there before the peak.
At Aso, pushing into the highlands early in the morning aligns clear visibility and crowd avoidance in the same direction. Placing Kusasenri or outer-rim viewpoints in the first half of the morning captures both scenery quality and driving comfort. Even with crater restrictions, having Aso's core scenery in the bank by midmorning frees the afternoon for Daikanbo or peripheral detours.
Takachiho Gorge transforms depending on whether you can secure a weekday morning slot. The trail is only about 30 minutes one way, but in peak hours, photo stops and boat queues make it feel twice as long. Getting into the gorge early and quiet, then expanding to the shrine side afterward, separates natural scenery from mythology sites in a way that gives each its own space.
The Nichinan Coast, run as a standard southbound day trip timed to hit midday at the popular stops, risks cascading delays. On weekdays, heading to the coast first thing works. On holidays, running the route in reverse to sidestep the midday cluster at the main stops is a practical workaround. The coastal route has low driving difficulty, but frequent stops mean a single delay ripples through the rest of the afternoon.
Across all three routes, the simplest timing rule is place your highlight stop in the early morning on a weekday. The inverse — arriving at the headline spot around midday — runs straight into parking pressure at Aso, trail and boat congestion at Takachiho, and facility crowding on the Nichinan Coast. Kyushu's scenic drives look completely different with just a one- to two-hour shift. Planning precision shows up more in clock management than in route selection.
Building Your Itinerary by Starting Point and Trip Length
Choosing a Route Based on Where You Start
The single most useful step when planning is letting your starting point pick your theme. If you are flying into Kyushu from elsewhere in Japan or abroad, the realistic options narrow to renting from Kumamoto and heading to Aso or renting from Miyazaki and heading toward Takachiho or the Nichinan Coast. On a map, the three themes look connectable, but because the scenery type and time-use pattern differ so much, matching your entry point to a theme raises the whole day's quality.
Coming in from the Kumamoto side puts Aso front and center. The route is built for driving, so picking up a rental car at the airport and heading straight for Kusasenri or the outer-rim area flows smoothly. For anyone whose priority is volcanic landscapes, this is the easiest itinerary to construct — and Aso is rich enough to fill a full day without thinning out. With a bit more time, spending one day on Aso and adding a half-day at Takachiho the next morning wraps up neatly.
From the Miyazaki side, the choice is between ocean and gorge. If coastal energy is the draw, head south from Miyazaki City toward the Nichinan Coast. If walking time matters more, drive from Miyazaki Airport or the Nobeoka area toward Takachiho. Even under the same "Miyazaki start," a Nichinan day and a Takachiho day use time in fundamentally different ways. Stacking both into one day tends to leave you with strong memories of driving rather than of the scenery itself.
A Fukuoka start offers apparent flexibility but tends to stretch driving time for scenic-drive purposes. Renting at Fukuoka Airport and driving to Aso is viable, but trying to string Aso, Takachiho, and the Nichinan Coast from Fukuoka pushes transit time above sightseeing time. From Fukuoka, committing to Aso alone or relocating to the Miyazaki side first and picking up the coast or gorge keeps satisfaction steadier.
The reason "do all three in one trip" does not get a recommendation here is not about quantity — it is that each theme demands a different kind of time. Aso needs morning visibility and driving flow, the Nichinan Coast needs stop-and-go flexibility along the shore, and Takachiho needs walking hours. Separating them into a volcano chapter, a coast chapter, and a gorge chapter makes each one sharper and the memories more distinct.
Day Trip and One-Night Model Itineraries
The most reliable day trip fixes on a single theme. From Kumamoto Airport, place Aso's highland scenery in the morning, use midday for transit and a meal, and add a viewpoint in the afternoon. Aso's loop route has enough along its length that the day fills itself without forced side trips — a strong fit for driving enthusiasts and families who want to limit walking.
From Miyazaki City, a day on the Nichinan Coast round trip is the most natural shape. The coastal route rewards getting popular sections like Horikiri Pass into the morning light, then shifting to food and movement around midday. The Nichinan Phoenix Road's roughly 80 km gives the day a satisfying scope for anyone who wants a full serving of subtropical coastline, and the timing works for returning to the Miyazaki airport area by evening.
Fitting Takachiho into a day trip works best when you stage it from Miyazaki's northern side or Nobeoka rather than attempting the long round trip from Miyazaki Airport. The gorge trail is about 1 km and 30 minutes one way, so even a half day covers the highlights. Morning gorge walk followed by nearby shrines balances walking time with car movement — a format that suits solo travelers and couples looking for immersive scenery.
One overnight opens the door to two themes. The classic pairing is Aso for day one, Takachiho for a half day on day two — volcanic scenery first, then gorge walking to shift the trip's rhythm. Another strong combination is the Nichinan Coast on day one, Takachiho on day two — ocean openness followed by mountain-valley quiet, with a contrast sharp enough to keep the trip from blending together.
Pushing all three themes into a single overnight is not recommended. Something inevitably gets downgraded to a pass-through, headline spots get pushed to midday arrival, and the different time demands — driving hours for Aso, stop frequency for the Nichinan Coast, walking hours for Takachiho — stack into fatigue that hides behind excitement until the energy drops. With limited days, one theme per day with a half-day addition is the balance that works.
ℹ️ Note
When the schedule feels uncertain, placing flagship segments — Kusasenri, Horikiri Pass, or the Takachiho Gorge trail — into a weekday morning slot and using midday for meals and transit tends to give the day a clean shape. Scenic highlights in the morning, low-effort segments in the afternoon — that sequence keeps things sharp.
Can You Mix in Public Transport?
These three routes default to rental cars, but public transport is not entirely off the table. The deciding question is whether arriving at one point satisfies you or whether you need the freedom to improvise stops along the way. The former makes bus-based access workable; the latter makes a car indispensable.
Aso illustrates the split clearly. A bus runs from Aso Station to the Kusasenri Aso Volcano Museum stop in about 25 minutes for 570 yen (~$4 USD). From Aso Kumamoto Airport, the same museum stop is reachable in about one hour for 1,400 yen (~$9 USD). So treating Kusasenri as a single-destination visit by public transport is entirely realistic — go, spend time on the grassland, and return the same way for a satisfying day trip.
Where the gap appears is in everything beyond that single stop. Chaining Kusasenri to another viewpoint, adjusting for crater conditions on the fly, swinging out to the outer rim for a different angle — bus schedules simply cannot keep up with that flexibility. In my experience, public transport at Aso secures "a place you can reach" but falls short of "the freedom to chase the best scenery that day." For an article about scenic drives, the car's value at Aso is hard to argue against.
Takachiho faces a similar dynamic — guaranteed walking time after arrival means a long connection eats into the day's energy budget. The gorge itself is manageable by bus, but extending to the surrounding shrines and viewpoints asks for a car. The Nichinan Coast is the most car-dependent of the three: the value lies in connecting scattered coastal stops at your own pace, pulling over when the light is right, and doubling back to a spot that caught your eye. None of that translates to bus schedules.
A practical rule of thumb: Kusasenri alone by bus is fine; the Aso loop, the Nichinan Coast, and the wider Takachiho area all favor a rental car. When flying in from outside Kyushu, picking up a car at Kumamoto or Miyazaki slots your trip into a smoother shape. At scenic destinations, what determines satisfaction is not distance but the freedom to stop and the ability to allocate your time — and that is where driving wins.
Budget, Driving Tips, and What to Pack
Cost Breakdown and Estimates
Breaking a day's expenses into rental car, fuel, tolls, parking, and on-site activity fees is the clearest way to budget. The two items that create the most variation are Aso's toll road on crater days and Takachiho's boat ride. The Aso Mountain Park Road runs 1,000 yen (~$7 USD) per standard vehicle, adding cost only on days you extend toward the crater side. Takachiho Gorge rental boats are 4,100 yen (~$27 USD) per boat on weekdays and 5,100 yen (~$34 USD) on weekends, holidays, and designated peak periods — reasonable per-person for two or more, but a noticeable line item for solo travelers.
Rental car rates fluctuate by season and vehicle class, but budgeting on the car fee alone underestimates the real spend. Airport pickups lead to longer driving distances and therefore higher fuel costs, Aso adds a toll, popular spots may have paid parking, and Takachiho layers in boat fees and incidental food and drink. My sense is that a day spent purely driving and a day that includes walking and activities hit the wallet differently. Aso and the Nichinan Coast skew toward "car-centric" costs, while Takachiho skews toward "car plus on-site" spending.
Walking time feeds into the budget picture indirectly. Takachiho's trail at roughly 30 minutes one way means on-site time adds up even without the boat, and photo-paced walking increases peripheral spending on drinks and rest breaks. Aso and the Nichinan Coast involve shorter bursts of walking at each stop, making per-stop costs more predictable.
For photo-focused visitors, a quick note on shooting conditions at the key stops: Kusasenri-ga-Hama opens up immediately from the parking area, but morning light can put the sun behind the peaks, so wide-angle shots that pull in sky and grassland tend to hold up best. Horikiri Pass is quick to frame — ocean color and the road's curve compose easily, and a polarizing filter brings the sea surface under control. Takachiho Gorge's Manai Falls requires the trail walk before you can shoot, and the narrow gorge means tripod use is influenced by crowd flow and any local rules — traveling light and staying mobile tends to serve this route better than heavy gear.
Safe Driving and Route-Specific Hazards
At Aso, the danger is that excellent visibility breeds overconfidence. Wide-open views and the excitement of climbing into highland terrain make speed creep up without you noticing. Crosswinds hit on exposed stretches, and downhill sections tempt brake-heavy driving. Separating "time to look at scenery" from "time to drive" reduces fatigue more than you would expect. In volcanic terrain, "great visibility" does not equal "easy road" — keeping that in mind prevents surprises.
The Nichinan Coast is not a technical challenge, but old-road sections change the sightlines, and pedestrians plus cars entering and leaving viewpoints mix into the flow around stops like Horikiri Pass. Merging speed differentials between sightseers and through-traffic call for earlier lane positioning. Coastal wind can make door opening and standing at viewpoints more physical than expected. Sunglasses cut sea-surface glare and reduce the eye fatigue that accumulates over a full day of ocean-facing driving.
Takachiho is less about driving distance and more about mountain-road unfamiliarity draining concentration. Continuous curves demand attention to oncoming traffic, and as you approach the center, tourist vehicles and pedestrians increase. What catches people off guard is that driving does not end at arrival — during peak hours, circling for parking burns focus before the walk even starts. Takachiho is best thought of as a place where the drive to the parking spot and the search for a space are part of the sightseeing experience, not a preamble to it.
Insurance is worth treating as a stability investment rather than a cost to minimize. Aso's highlands, the Nichinan Coast's sea wind, and Takachiho's mountain roads each present different conditions, but all share the common factor of driving unfamiliar roads at unfamiliar rhythms. Budgeting for collision damage waiver coverage up front tends to remove a background anxiety that otherwise colors every tight turn and narrow pass.
Having a weather-triggered decision threshold also helps. When wind at a viewpoint makes standing uncomfortable, when rain makes an umbrella impractical on a shrine path, or when mountain-road visibility shrinks oncoming-traffic margins — any of these is a signal to reduce the number of stops rather than push through. Cutting the itinerary short and concentrating on fewer destinations tends to preserve satisfaction better than defending the original plan.
💡 Tip
When Aso's eruption alert level rises or road conditions deteriorate from heavy rain or typhoon, a good rule is: reduce your headline stops without trying to replace every one. Keeping a bit of empty space in the schedule, rather than cramming in alternatives, usually produces a more coherent day.
Packing Checklist
Pack for highland wind, coastal sun, and gorge walking rather than for specific destinations, and you will cover all three routes without excess. Aso's high elevations catch wind that flatland clothing is not ready for, the Nichinan Coast delivers relentless sun and glare, and Takachiho demands real walking shoes. Footwear matters more than any other single item — even for a photo-focused trip, comfortable walking shoes outperform street shoes by a wide margin. Takachiho's trail is a proper walk, and Aso's viewpoints have uneven footing that sneaks up on you.
Minimum packing list:
- Comfortable walking shoes (for trails and grassland walking)
- Lightweight rain shell (doubles as wind protection)
- Warm layer for layering (highland and morning/evening cold)
- Sun protection (hat, sunscreen, sunglasses)
- Sunglasses (essential for coastal glare and strong daylight)
- Water bottle (vending machines can be scarce between stops)
- Small amount of cash (useful at smaller shops and parking areas)
- Offline maps on your phone (cell signal can be spotty in mountain valleys)
The rain shell is not just for rain days. Aso's highlands strip body heat when the wind picks up, and even a thin shell with wind-blocking capability changes how long you can comfortably stay at a viewpoint. Daikanbo and similar high-altitude stops feel cool even at midday — a packable layer earns its weight. Sun protection gets emphasized for the Nichinan Coast, but Kusasenri's open grassland is just as exposed. On the coast, sunglasses function as driving equipment as much as anything else.
For water, think in terms of "how far until I can comfortably buy another bottle" rather than whether a vending machine exists. Takachiho benefits from having a bottle before the walk starts; at Aso, wind-driven dehydration is easy to miss. A small amount of cash smooths out parking and small-shop purchases — running fully cashless occasionally stalls the flow. Offline maps pay for themselves in mountain-valley sections where signal drops are not dramatic but just uncertain enough to be distracting.
Photo-focused travelers do best keeping gear light. Kusasenri rewards wide-angle lenses that capture the grassland-to-peak sweep in a single frame. Horikiri Pass pairs well with a polarizing filter to manage ocean reflections. Takachiho Gorge involves enough walking — and enough foot traffic near Manai Falls — that a heavy pack works against you. For all three routes, the gear priorities are staying mobile and being ready for weather changes over maximizing focal-length options.
Wrapping Up: Your Next Steps
How to Use This Page
Start by working backward from your trip length and narrowing to one, or at most two of the three routes — Aso, Nichinan Coast, or Takachiho Gorge. Overloading the itinerary shifts your time from scenery to logistics. My own rule: for a day trip, commit to one route; for an overnight, fix one as the anchor and hold the second as an add-on if conditions cooperate.
Next, decide on your arrival airport or station and tentatively set your rental car pickup at Kumamoto or Miyazaki (for trip-building ideas and accommodation pacing, our 12 model overnight itineraries may be helpful). You do not need to lock in every stop at this stage — just figuring out which side of Kyushu you enter from makes the Aso-versus-Nichinan/Takachiho decision much lighter.
Then isolate the items that need a last-minute check before departure. Aso's crater restrictions, Takachiho Gorge's boat operations, and coastal facility status under rough weather all feed directly into your day's shape. Shift popular segments to weekday mornings, and consider reverse loops or early departures to dodge peak congestion. Pinning your planned stops and parking areas in a map app beforehand cuts down on decision-making at the wheel.
Checklist
- Narrowed your route to one, or at most two, based on trip length
- Decided on arrival airport/station and rental car pickup at Kumamoto or Miyazaki
- Checked Aso crater access, Takachiho Gorge boat availability, and coastal facility status before departure
- Placed headline stops in the early morning or on a weekday
- Saved stop locations and parking areas in your map app
Related Articles
12 Weekend Overnight Trip Itineraries in Japan You Can Actually Pull Off
Planning a weekend getaway in Japan works better when you start with travel time, budget, and transportation rather than a wish list of attractions. This guide compares 12 itineraries across the country using concrete benchmarks: Tokyo to Hakone in about 90 minutes, Tokyo to Niigata in roughly 2 hours, and Fukuoka Airport to downtown in just 10 minutes.
12 Must-Try Regional Dishes in Kyushu, Japan — A Prefecture-by-Prefecture Food Tour
Planning a food-focused trip through Kyushu? Listing local specialties by prefecture only gets you halfway there. The real trick is building your days around walkable hubs — Fukuoka's shrine approach roads, Saga's morning markets, Nagasaki's Chinatown — and slotting dishes into morning, noon, and night.
How to Spend Your Time at Ginzan Onsen in Japan | 2 Hours to an Overnight Stay
Multi-story wooden ryokan line both banks of the Ginzan River, and the scenery shifts dramatically by the hour — intricate plasterwork by day, a slow transition at dusk, and the warm glow of gas lamps by night. The same street feels like an entirely different place each time.
8 Hidden Scenic Spots in Japan's Tohoku Region: Season, Difficulty, and Access Compared
Planning a trip to remote, stunning landscapes in Tohoku, Japan? Road conditions, ropeway schedules, and seasonal bus routes can dramatically change how difficult each spot is to reach. Mountain roads, aerial tramways, and seasonal services shift frequently, so